Friday, September 28, 2012

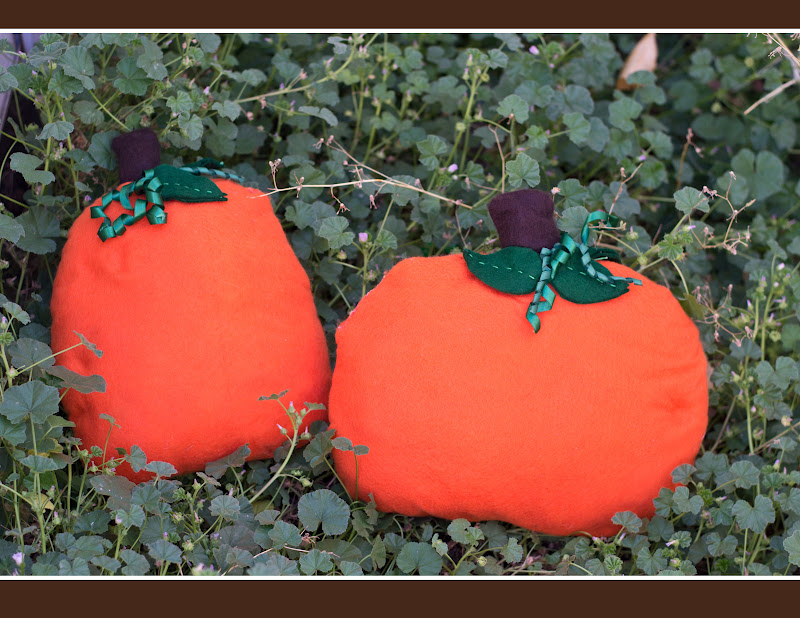
Pumpkin Pillow Pals

It's officially my favorite time of the year! Crisp apples, cool evenings, cozy sweaters, colorful leaves, and absolutely everything smells like pumpkin and cinnamon. Love it. Love it. LOVE it! I've been feeling like my house could use a bit of harvest cheer lately, so I whipped up some pumpkin chocolate chip bread to get that yummy fall flavor in the air, and then I went out to the garden to pick some darling little pumpkins. 
Except they're not real pumpkins, they're pillows. And they didn't grow in the garden. I don't have a garden... I don't even have a yard. 

 But still they're cute right? 
But wait, there is more to these pumpkins than meets the eye...
NOW how cute are they!? 

Ah! So fun!
"So, what are they?" you ask?
Well, it's like what you would get if Mr. Potato Head and a Pumpkin had a baby... or maybe Mr. Potato Head and a Pillow Pet... Either way... the Pumpkin Pillow Pal was born! 

Thursday, September 20, 2012

A New Start

Hello school year, how we have looked forward to  you!

What--you all started school several weeks ago?  Yeah, we did too.  But I'm just now feeling like I've almost got the hang of this new schedule...ish.  Maybe I'm a little slow.  But I'm in serious need of some new organization around here.  And some way to train the natives as to our new routine.

Is my child the only one who can take 30 minutes to get undressed?  And then runs around the house naked before I threaten to lock him in his room until his clothes are on...and then we rush out the door, get to school late, and little creatures keep yelling at me because THEY wanted to {wash their hands} (insert whatever I just helped them do) BY THEMSELVES and now they refuse to do ANYTHING at all.

We've been doing a lot of "you can come out of the corner when you can show me a happy face."  But they won't let ME stay in the corner until my face is happy...

I'm thinking the new routine is throwing them off.  And maybe me too.  So, I introduce...

{dooh doo doo DOOOOOOH!}

Our new sticker chart:


Friday, September 7, 2012

DIY Laminated Placemats

How does the old song go? "Sometimes you gotta pray just to make it through the day?" Well I totally agree. Prayer and ice cream and the promise of bedtime. My mommy survival kit would not be complete without the hidden stash of chocolate ice cream in the freezer! Who's with me?!  Don't pretend like you don't have one. This is a Mom-blog. Your secrets are safe here, I won't tell your Zumba instructor on you.

Well, it's been one of those weeks over here. In fact last night I collapsed in bed at about 12:30 after running 100 mph all day and realized I had never stopped to eat dinner. I made dinner. I fed my kids dinner. I cleaned up dinner. But somehow I didn't manage to eat any of it. How does that happen? I dragged myself out of bed, opened up the pantry and grabbed the first thing I saw. Oreos and milk for dinner? Don't mind if I do!

Anyway- big news at our house!  We finally bought a kitchen table big enough for our family to sit at! (For years now we've taken turns eating, or we adults end up standing at the kitchen counter to eat. Call me crazy but sometimes it's nice to actually SIT down to a meal.) It's beautiful, and I love it. However the problem is it's beautiful and I LOVE it!  I panic every time the kids sit down because without fail they end up gouging my gorgeous wood table. The first time it happened they were pounding on it with  their silverware chanting "We want food! We want food!"  AHHH! Not cool. I needed to think of a solution and QUICK!

Enter exhibit A) The placemat!
*Note* the table in these pictures is NOT our new table. This is our teeny tiny one. :) What can I say? The lighting is better in the kitchen than in the dining room. 
I didn't want just any run of the mill placemat. I wanted something cute and whimsical that would go with our current crazy color scheme. I also wanted them to be wipeable, because Hi- I have kids. So I went through my fabric stash and used a bunch of scraps I had left over from my pillows and curtains, and then shopped the clearance section at JoAnns for a few coordinating prints.

These could not have been any easier. 

Cut some rectangles, mine are 11 x 17. They're pretty big which works for us but I might go smaller if you don't have a huge table. They don't have to be perfect at this point, you can trim them up later.

 Then, because I wanted to make mine reversible I used some HeatBond and ironed two pieces together.

I trimmed them up and took them to Kinkos where I had them laminated. I went ahead and used the nice heavy laminate because I wanted them to last. It cost about 2 dollars for each place mat. Not shabby considering it has totally saved my kitchen table from the damage caused by my little bunch of crazies. :)

There you have it. 
The perfect combination of whimsy and practical. The girls love that they can flip their mat over and pick which side they want to use. I love that they add such a fun pop of color to our table. And as an added bonus they make post-dinner clean up so easy! The girls love to help me wipe down the placemats before we put them away.



 photo bloglovin_zps73d7815c.jpg

Tuesday, September 4, 2012

A Ramble Plus A Vintage-y Butterfly Card

Do you ever feel like you might just drop dead from being a mother?  It's been one of those weeks...or months.  But I'm hoping I'll come out of the slump soon.

It's a good thing I have hobbies, or I would go crazy!  Even though sometimes I don't have as much time as I would like for them, I love being able to sit down and do something that I want to do--that is completely unrelated to the needs of my husband and kids (as dearly as I love them).  I think it is a reminder that Mommy is a person (check out that awesome post if you need a reminder) too, and I deserve to have some of my precious time spent on myself.

So I make cards.  I like to tell myself that they will serve a purpose someday.  That I will someday be a thoughtful person who is constantly writing little notes of gratitude and affirmation to everyone I've ever met.  So far, that transformation hasn't occurred...but I do have an ever growing stash of cards waiting for that blessed day.  Until then, I use the wedding and birthday cards pretty often and it is therapeutic to cut and glue and dream about how I want my card to turn out!

Someday I hope to make a different transformation to "incredible scrapbooking mom."  Apparently I am too intimidated by the vast enormity of 12 x 12 inches in a scrapbook layout?  Maybe I avoid it because of my semi-disastrous attempt at designing digital scrapbook supplies (turns out, at the time, I could either be a mother to my brand new first baby, or have my own personal hobbies and interests--not both!), maybe I know that having a scrapbook would have such a profound impact on my children's lives that I get overwhelmed and psych myself out.

Cards are easier.  Smaller.  Less far reaching.  Plus my neighbor helps me stay motivated.

She started a card group--there are about twelve of us that get together every month (except me...this will be my first month back since baby #3...in January...).  We bring 12 cards that we have made, and then we pass them all around and everyone takes one.  Voila, 12 different cards to add to my collection!  It is fun to get inspiration and styles that aren't my own.


This is the card I will be taking next week:


What is your sanity-keeping outlet?

Wednesday, August 22, 2012

A Quick Gift

I've got a post of a more serious nature brewing, but there are a couple more things that need to be taken care of first, so I thought I'd share our latest grandparent birthday present!

I can't take credit for this one--it was Kirby's idea to do it for his parents, but he got the idea from Jamie's Father's Day roundup post HERE.

We wanted to give them something that the girls created that they could display somewhere, and you all know it's totally "in" to have your last name hung somewhere! Why not incorporate some finger painting while you're at it!?


The canvas was $15 after 50% off at JoAnn's. We were looking for a canvas just this size (I think it's something like 1x3 feet? Kirby actually did the purchasing, so I never saw the actual dimensions. I know, I know--how manly is my man to walk into JoAnns all by himself AND use a coupon from the JoAnns app on his phone!?). We had decided, though, that if they didn't have a canvas the size we wanted we could get three smaller canvases and break the last name up into DA-VIS-ON. Would have been fun that way, too! 

Kirby shaped the letters with painter's tape (I know--he's HUH-MAZING!) and then we let the girls go to town. I let Emily pick between an orange/red/yellow color combo or a blue/green/yellow combo. I made sure to pick colors that wouldn't turn into brown if they got mixed. You can see that spot above the V where it's pretty much one solid green color--Emily just kept going over the same spot over and over again. If there had been any complimentary colors in the mix that would have been completely brown. I just stuck each color in a separate paper bowl, but you could definitely just drizzle paint directly onto the canvas and then mix them that way.

The splatters are complimentary of Kirby--husband of the year, yet again. Mr. Artsy! LOVE HIM!

Can you spot Emily's handprint and Sydney's footprint?

Emily thought this project was the coolest thing since fruit snacks, but Syd kept trying to get the paint off her hands. We'd put some on, and she would just try to wipe it off on her belly. 

I had already started to rinse the girls off with the hose when I thought to document how adorable the girls looked, and Sydney was not happy with me. Not at all.


Tuesday, August 21, 2012

Delicious Buttermilk Syrup

 Lauren and I grew up across the cul-de-sac from a chef who taught my Mom this delicious recipe.  I know my first thought when I hear buttermilk syrup is "HUH?"   Bet let me tell you--this stuff is incredible!  BEWARE: this is not a low-calorie condiment (is syrup a condiment?) so keep yourself from drinking it plain!  My favorite part of this recipe (besides the taste) is that I always have the ingredients hanging around so it's easy to make whenever I run out!

 The Ingredients
Butter, Sugar, Buttermilk (or milk+lemon juice), Baking Soda, and Vanilla

 What if you don't have buttermilk?
Easy peasy.  For my double batch of syrup, I needed 1 cup of buttermilk.  So I took one cup of milk and added 1 Tablespoon of lemon juice.  I mix this part up very first so it has a couple minutes to buttermilk-ify.  (Yeah--it's a word...).  I love this trick--you can use it anywhere you need buttermilk!  You can also use vinegar, but I like the way lemon juice turns out hands down!

Just a Tip:
Use a bigger pan than you think!  Looking at the recipe, you will think a small saucepan will do the trick.  But there is serious bubble-age here-see?  My double batch barely fit in my four quart pot!

Buttermilk Syrup
1/2 cup Butter
1/2 cup Buttermilk (make your own with 1/2 c. Milk and 1/2 Tablespoon Lemon Juice!)
1 cup Sugar
1/2 tsp. Baking Soda
1 tsp. Vanilla

Melt butter in large saucepan (volume of mixture will increase as it boils).  Add buttermilk, sugar, and soda.  Stir well.  Bring to a boil; boil for one minute, stirring constantly.  Remove from heat and stir in vanilla.  Makes about 2 cups.


Thursday, August 16, 2012

Gumball Necklaces

About a year and a half ago my sister in law and I decided to make bubblegum necklaces for our girls for Valentine's Day. Well, being the supermom that she is- she made necklaces, and I let my bubblegum sit in a bag on the counter until it got old and stale. (Please tell me I'm not the only one who does stuff like that.) Since then these tasty necklaces have been on my "I really should do that someday" list, but somehow always get overlooked. 

, about a week ago we decided to throw a little tea party for the grandchildren and these necklaces were one of the activities the kids helped us do. Turns out they are SO easy to make, and they were a huge hit with our little princesses. 

LinkWithin

Related Posts Plugin for WordPress, Blogger...